| 307-01B Automatic Transmission - Vehicles With: 6-Speed Automatic Transmission - 6F35 | 2013 - 2014 MKZ |
| Diagnosis and Testing | Procedure revision date: 08/22/2013 |
NOTE: Do not try to stop the transmission fluid leak by increasing the torque beyond specifications. This may cause damage to the case threads.
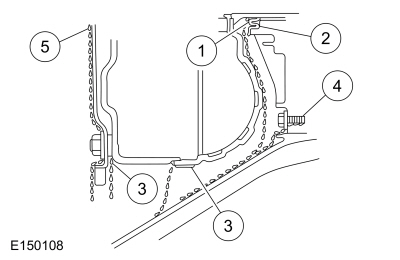
Check transmission fluid cooler tubes and fittings between the transmission and the transmission fluid cooler for wear or
damage. When transmission fluid is found leaking between the case and the transmission fluid cooler tube fitting, check for
a missing or damaged seal, then tighten the fitting to specification.
REFER to:
Transmission Fluid Cooler Tubes
(307-02B Transmission Cooling - Vehicles With: 6-Speed Automatic Transmission - 6F35, Removal and Installation).
REFER to:
Transmission Fluid Cooler Tubes
(307-02B Transmission Cooling - Vehicles With: 6-Speed Automatic Transmission - 6F35, Removal and Installation).
If the leak continues, install new transmission fluid cooler tubes and tighten to specification.
REFER to:
Transmission Fluid Cooler Tubes
(307-02B Transmission Cooling - Vehicles With: 6-Speed Automatic Transmission - 6F35, Removal and Installation).
REFER to:
Transmission Fluid Cooler Tubes
(307-02B Transmission Cooling - Vehicles With: 6-Speed Automatic Transmission - 6F35, Removal and Installation).
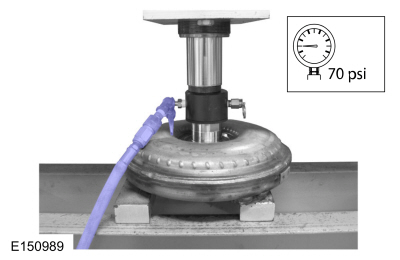
Check the engine coolant in the radiator. If transmission fluid is present in the engine coolant, the transmission fluid cooler
is probably leaking. The transmission fluid cooler can be further checked for leaks by disconnecting the transmission fluid
cooler tubes from the transmission fluid cooler and applying no more than
50.0
psi (
345
kPa) of air pressure to the transmission fluid cooler fitting. Remove the engine coolant reservoir cap to relieve the pressure.
If the transmission fluid cooler is leaking and will not hold pressure, install a new transmission fluid cooler.
REFER to:
Transmission Fluid Cooler
(307-02B Transmission Cooling - Vehicles With: 6-Speed Automatic Transmission - 6F35, Removal and Installation).
If transmission fluid leakage is found at the
TR
sensor shaft seal, install a new manual control shaft seal.
REFER to:
Selector Shaft Seal
(307-01B Automatic Transmission - Vehicles With: 6-Speed Automatic Transmission - 6F35, Removal and Installation).
The main control cover is sealed to the transmission case with silicone sealant and seals to the solenoid body with a reusable
rubber gasket.
REFER to:
Main Control Cover
(307-01B Automatic Transmission - Vehicles With: 6-Speed Automatic Transmission - 6F35, Removal and Installation).
REFER to:
Main Control Cover
(307-01B Automatic Transmission - Vehicles With: 6-Speed Automatic Transmission - 6F35, Removal and Installation).
If transmission fluid leakage is found at the transmission internal wiring harness frame connector, install a new main control-to-cover
seal.
REFER to:
Transmission Internal Wiring Harness Frame
(307-01B Automatic Transmission - Vehicles With: 6-Speed Automatic Transmission - 6F35, Removal and Installation).
The
TSS
sensor is sealed to the transmission case with an O-ring.
REFER to:
Turbine Shaft Speed (TSS) Sensor
(307-01B Automatic Transmission - Vehicles With: 6-Speed Automatic Transmission - 6F35, Removal and Installation).
Leak Check Test
NOTE: When diagnosing transmission leaks, the source of the leak must be positively identified prior to repair. If the vehicle is driven extensively between adding the fluorescent additive and performing the leak test, the leaking oil can spread and make identifying the location of the leak difficult.
Use one 1.01 fl oz ( 30 ml) of dye solution for every 4.01 qt ( 3.8 L) of transmission fluid.
Copyright © Ford Motor Company